Perfecting the Push-up
The push-up is a fundamental exercise but it’s notorious for its difficulty; consequently, it is frequently performed incorrectly. We love programming push-ups for our clients because they do not require equipment and they’re great tools for developing core and upper body strength. The trick with push-ups is determining the best way to scale them so they are appropriate for your current level of strength. We have outlined a strategy below that we use with our clients to help them progress their push-ups.
Form and Technique.
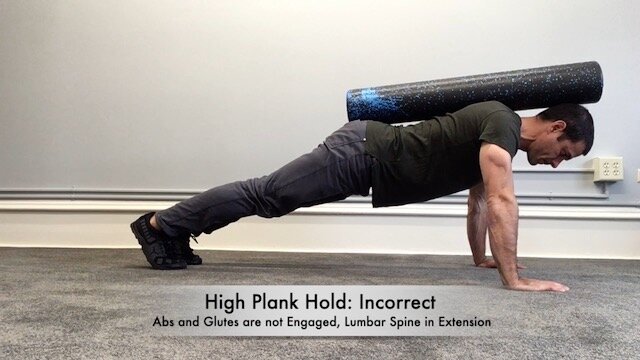
Core. The push up is essentially a moving plank. Like a plank, it requires you to use your core and upper body to stabilize your spine and torso. It is key to note that your “core”refers to your entire torso from your abdominals to your lower back and glutes. The primary job of the core is resisting movement, rather than producing movement. When holding a plank position, your core is preventing your spine from going into extension (arching your back). For both planks and push-ups, you want to remain in a straight line from your head to your heels, focusing on keeping your pelvis tucked toward your belly button, your ribs pulled down and your abdominal muscles engaged.
Elbow Position. Your arms not be sticking straight out, nor should they be touching your ribcage. They should form a 45 degree angle angle with your torso. Think about making an arrow with your body.
Progressing to a Push-up
Anterior Core Strength. Use progressive exercises including the bear plank, front plank, ring fallout and body saw to develop core strength and motor control. Work up to holding the bear plank and front plank for 30 seconds, then move on to the fallout and later the body saw to increase intensity.
Hands Elevated Push-ups. Remove some of the load on your core and upper body by elevating your hands. The higher your hand position, the lower the load. Start with 36 inches (kitchen counter) and take 4 seconds to lower your body until your sternum touches the surface. If this is still too challenging, find a higher object. Ensure that you are maintaining a straight line from your shoulders to your heels at all times. Keeping your heels off the floor will facilitate this. Start with 3-4 sets of 3 repetitions and gradually progress to sets of 6 repetitions. Tip: Increase core engagement by squeezing a small pillow, or rolled up yoga mat between your knees.
Increase Intensity. Once you can can perform 3-4 sets of 6 reps, increase the intensity by lowering your hands about 6 inches and reducing the repetitions back down to 3. Continue to progress over time by increasing the repetitions back up to 6. An additional rep per week is typically a good goal, but everyone responds differently. Progress at your own rate. Repeat this process by gradually reducing the elevation of your hands.
Eccentric Only Push-ups. Once you can perform hands elevated push-ups on a 12-18 inch surface, also practice eccentric only push-ups on the floor. In this exercise you are only performing the lowering portion of the exercise. Strive to do 2-5 reps per set.
Bottoms Up Push-up. Use this exercise when you have progressed to the point that you can perform a push-up on the floor, but cannot maintain good form for multiple reps. For this variation, start in the low position, perform 1 rep, and return to the start. Rest and regroup, then reengage your core and complete another rep. Work up to 3-4 sets of 4-5 single repetitions.
Stop at Technical Failure. No matter what level you are at, don’t try to eke out compromised reps. Once you feel that your form is wavering, discontinue the exercise. Your body isn’t benefiting from poor technique and you are only increasing the potential for injury.